The Project
August 16, 2010 § 2 Comments
The project was to take a 1977 Schwinn Le Tour and re vamp it. Since I live in the city, and I have no need for lots of gears, a single speed was the chosen option. Here is a what, how, and how much it took to take the old to new.
Big Thanks to Joh Josephson for the bike!


Break Down
June 16, 2010 § Leave a comment
The first step to the conversion was the break down.
What you need:
- Socket Set
- Wrench Set
- Chain Break Tool
- Crank Tool
- Allen Wrenches
- WD-40
- Pliers
- Wire Cutters
- Phillips and Flat Head Screwdrivers
- Dead Blow Hammer (Or Something Big to do some Hitting)
I started with this bike by taking off the seat post first. This is not easy, since it is old, and rusted on. It took a good amount of effort to get it off. Next I moved to the wrap on the handle bars. This was very easy to get off and only required a screwdriver to removed the bar ends.
Once the tape was off I removed the break levers, first removing the cable from the lever. Next I followed the cable down and un attached the brakes from the cable. This was done just by squeezing the brakes with my hand and releasing the cable from the clip. Once the cable is off remove the brake with a wrench and make sure to keep all of the bolts and washers.
Next remove the stem. This is done by loosening the bolt in the top of the stem with a wrench. This should come out fairly easily, however the stem will not come out of the frame easily. This will take some banging with your hammer. Try to warp a t-shirt around it before you hit it! There is a conical shaped metal piece that fits in the base of the stem. Make sure to keep this because you need this to re assemble the bike.
Now you can remove the shifters.
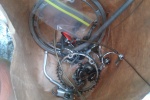
Once the shifters are off, remove the bike chain. Use the chain break tool to break the chain. This can not be done any other way. A tool costs $14 bucks. Next follow the shifter cables down and remove any cables, and housing. You will not need any of this later on.
Next disconnect the front and rear derailleur. Once these are off, and the chain is off comes the crank.You will need a crank tool to do this. Remove the dust cover by un screwing it from the bike. Then use a socket set to remove the nut which holds on the crank. To remove the crank you will need your crank tool. I had a hard time figuring out how to work this because there are no instructions. I had to remove the piece on the front of the crank tool with a allen wrench. I think this is to keep the crank together before you get it home. DO MAKE SURE TO DO THIS! The crank tool will screw in and then push the crank off. This takes some muscle.
Now your bike should be taken apart.
Clean it up, and figure out what you want to keep and what you want to buy.
P.S. You can also remove the wheels when ever you want. If you are keeping them place them to the side.
Vintage vs. New
May 16, 2010 § Leave a comment
So I was face with a big question, what do I keep and what do I get rid of. Since the bike was a family bike I wanted to keep it as vintage as possible. Not to mention I’m not all that hipster so a crazy bike just wouldn’t fit me. But I figured I could ride a classic anywhere, anytime. To help keep it classic I decided to keep as much as I could. With a few exceptions.
I got rid of:
- The handlebar tape – Bought New
- Some of the Handle Bar – Modified them to meet my needs
- The derailleurs- Don’t need any
- The Rims, and Tires- Upgraded to Velocity and Weimann
- The Reflectors! – NO THANK YOU
- The Seat – Upgraded, the seat wasn’t the original so no worries here
- The Seat Post – Wanted Aluminum, and one that wasn’t rusty
- The Chain – Yes
- The inner Cogs on the front cog wheel – Don’t need them on a single speed
- Brake Wires and Housing – Rusted so made new ones
- The Dirt and Grime!
- Brake Levers – Did not want my brakes on the drops on the handle bars, and wanted to keep the “fixie” look so used Cross Top Levers
I Kept:
- The Look
- The Paint
- The Handle Bar (modified it)
- Frame
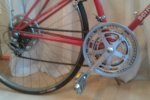
- Crank
- Front Cog Ring
- Pedals
- Stem
- Front Fork
There are lots of reasons I did what I did, and you should weight the cost of new, and the importance to you riding or just looking cool. My conversion cost me about $450 total for all of my parts. If I had kept more it would have cost a lot less, but not been as nice.

New Parts
March 17, 2010 § Leave a comment
So once I had the bike stripped down I had to go and find some new parts. I had decided on what parts I wanted to buy. I was set to get some new rims, tires, tape, cables, saddle, post, and crank. I ended up not getting the crank and adding in brake levers. So it all came out about right.
Searching for the parts was the fun part. I started my search on google, and found out the different parts I wanted from just searching around and reading. Origin 8 has lots of good stuff at great prices. You can spend lots of money on these parts, but you dont have to. The truth is you don’t have to spend any, but then it’s not as fun.
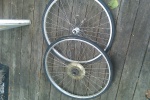
Rims: I wanted to get rims, so I had no clue on where to start. I didn’t even know the term “Fixie” or “track” to know to search for those terms. I came across some rims on Amazon by AeroMax, they looked good and they were a full set of tubes, tires, rims, and free wheel for 100 bucks. I passed on them once I read a review. I came across Weimann rims and found a pair at the LBS. I ended up getting a Weimann rear wheel with origin 8 hub, and a Velocity Front wheel with the same hub. They are silver and really good looking, you almost can’t tell they are not a pair.
-150
Saddle: I looked at lots of different saddles, all under 30 bucks. I didn’t want or need a nice saddle since this wasn’t a long distance bike. So Origin 8 had a great lether saddle in my price. My LBS had it in stock.
-30
Brake Levers: These were pulled off a new Origin 8 bike in the LBS since he didn’ t have any, and I need some. They are cross top levers and look great.
-35
Cables: The LBS ordered the cable housing I needed, and the cables. I put it together at my house.
-15
Seat Post: I decided on a black seat post, and I would advice against this. It scratches easily when you are sizing so be careful.
-25
Tires: I got some Serfas Seca’s becuase of how they looked, and they are good tires.
-50
These are the price for the products online, but support your local LBS and get them there. It costs more, but you get the added service, and someone to bouce ideas off of.
Putting It Together
February 17, 2010 § Leave a comment
Once I had all the parts I came home with the intent to get it all together. Putting a bike together is pretty basic but there are some things to note.
1) Remember where things go. When you are taking it apart use Ziploc bags, and label, label, label.
2) Go Slow, or you might round a nut, or break a bolt.
3) Clean the hell out of it. If you don’t do it now, you wont do it for a long time.
4) Use Lube! Lots of the parts are not going to work right away if they are old. They might need some tough love to fit, or some lube to get them into place.
5) If you get stuck, google it! I can’t tell you how many places there are to find this information so look around.
Enjoy this process, and take your time. The results will be amazing, and your will be so proud of your bike. I know I am.
I did run into some issues with my breaks which took me some time to figure out. Remember Right Brake is the back break. Keep your old housing to measure for your new, and test them out before you cut them. If you save the old end caps to your housing you can use them again, and they look great.
I also ran into some trouble with my seat post, since the original one was not 100% perfect fit, the new one wasn’t either. It took some lube and tough love to get it into place.
Make sure to tighten all of your bolts before you go for a ride.
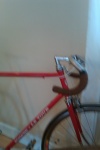
I had had many bikes, but never a road bike. So warping handle bars was a first for me. I watched a video on YouTube on how to do it and it was very easy. I didn’t wrap mine all the way up, and it looks great.
To shorten my handlebars I used a pipe cutter. It costs $8 and you can then either chop them into bull horns or just modify them to fit better. This is super easy.


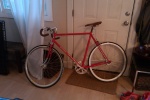
Finished – 1977 Schwinn Le Tour “Fixie”
January 17, 2010 § Leave a comment
Here are the pics of my bike finished.
Details-
- Total Time: Lots of research and dreaming up the bike, a day to buy the parts, and about a day to put it together and test drive it.
- Total Cost: $428 with the frame being free
- Frame: 1977? Schwinn Le Tour Original Paint
- Crank: Original 52t
- Wheels: Weimann Rear with Flip Flop Hub (22t Free/20 Fixed), Velocity Front with origin 8 hubs
- Brakes: Origin 8 Cross Tops
- Gearing: 52/22
- Handle Bar: Modified Original by cutting 2″ off the ends, and tilting it down more.
Enjoy and Good Luck with your build!